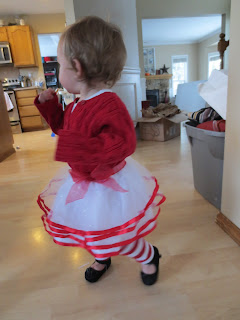
Before Christmas I got the cutest legwarmers from BabyLegs for Little Miss.
I especially loved the candy cane ones
but she didn't really have anything to wear them with.
So, I decided to make her a little tulle skirt to match.
I made this for Christmas but I'm exited to put her in it for Valentine's Day too! It's coming up!
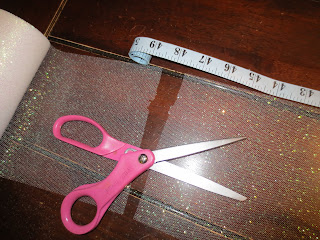
I picked up a roll of sparkly tulle in the wedding section at Michaels because that's where I happened to be when I thought about it and I didn't want to drive all the way down to Joanns.
The roll was only 6" wide which was perfect for baby girl.
Then I searched the web for a tutorial on how to make a quick and easy tutu skirt.
Although there were plenty of wonderful tutorials
I ran into a few problems:
1. The no-sew tutorials used a lot more tulle than I had bought (and of course I was making this skirt at 10pm on Saturday night for her to wear to church in the morning, therefore, no time to get more tulle.)
2. I wanted a solid layer under the tulle so that you didn't see her naked legs and onesie underneath. (no tutorials for that)
3. I wanted to be able to see the different layers of the skirt not just have a big poof ball of tulle.
(no tutorials for that)
SO...I decided to come up with my own tutorial.
AKA fly by the seat of my pants.
Things I used:
6" x 10 yd roll of tulle
white satin for underneath layer
roll of 1/4" red satin ribbon for trim
roll of 2" wide red ribbon for waist trim and bow
elastic
sewing machine
red thread
white thread
scissors
pins
Disclaimer: If you choose to use glittery tulle like I did, there will be glitter EVERYWHERE. My house, my child, and myself were all covered with glitter for days. Even the bench that we sat in at church was more than quite sparkly when we left. You have been warned!
Step 1 : I had to decide how many layers of tulle I wanted and how long I wanted my skirt to be.
I knew I wanted four layers of tulle, each layered 1inch above the other.
Since my tulle was 6 inches wide, I knew having each of my other layers one inch above the last would make my finished skirt 9 inches.
Step 2: I had to decide how full I wanted to make the skirt. Since my little girl's waist is 16 inches around, I multiplied that by three and cut all my layers of tulle 48 inches long.
If you want your skirt more full just cut your layers longer.
Step 3: Using red thread I used a straight stitch to sew the ribbon along the bottom of each layer of tulle.
This is after I had sewn the ribbon on the bottom of each layer.
By adding the ribbon, now you can really see each layer. Exactly what I wanted!
Step 4: Next I cut my underneath layer of satin 9 1/2 inches by 48 inches long. The extra half inch is for the hem.
Step 5 : Then I ironed up the hem 1/2 inch and sewed it using a straight stich with the white thread.
NOTE: On my fabric it was already the selvedge edge which means it was a finished edge that would not unravel so I only had to fold it up once. If your fabric is not on the selvedge edge then you will need to add an extra 1/2 inch to the width of your fabric when cutting it out and then fold it over and iron it down twice before sewing so that the unfinished edge is inside the fold.
Step 6: Sew your first layer of tulle onto your satin lining using a straight stitch. Make sure to line up the ribbon edge of the tulle with the hemmed edge of the satin lining.
Step 7: I forgot to take a picture of this step. Sorry! What you are going to do is take the two ends of each layer and match them up right sides to together and sew using a straight stitch, making sure to backstitch when you start and end. Do this to each layer and you should now have three loops of tulle and one loop with tulle and satin. I hope that makes sense :)
Step 8: Next I sewed a gathering or basting stitch about 1/4 inch down from the unfinished edge on the stain layer and then another gathering stitch 1/4 inch below that all the way around.
No backstitching.
Step 9: Gather the top of the skirt as evenly as possible until it is the size that you are going for. In my case 16 inches around.
Tie your loose strings so that your skirt stays that size while you are adding the other layers.
Step 10: Gather your other layers of tulle. An easy way to do this is to just hold the tulle tightly as it feeds through your sewing machine.
As you can see it will naturally gather in the back and you can loosen it or gather it tighter to the size you need after you have sewn all the way around.
Step 11: Slide your gathered layer of tulle down over the satin lining and pin it one inch above the last layer all the way around. Sew using a straight stitch all the way around making sure to back stitch.
Step 12: Repeat with the last two layers of tulle. Your last layer should line up with the top of the satin lining.
Step 13: Turn your skirt wrong side out and attach your elastic to the waist of the skirt by matching it up to the top unfinished edge on the WRONG side of the skirt and sewing all the way around using a zigzag stitch. Be sure to pull the elastic tight as you sew it around so that it will bunch up and be stretchy when you are done sewing.
Ignore the red ribbon in this step, I got a little ahead of myself.
Step 14: Again, forgot to take a picture, dang!!
To cover the elastic and unfinished edge, lay the wide red ribbon on top of the elastic with the bottom of the ribbon just slightly below the bottom edge of the elastic. (NOT like the picture above)
Sew using a straight stitch along the edge of the ribbon directly below the elastic, stretching the elastic completely as you sew all way around. This will allow the ribbon to gather and stretch with the skirt.
I didn't measure my ribbon I just left it on the roll as I sewed all the way around and about an inch past my starting point making sure the ribbon continued to match up. Then I cut off the excess ribbon and used a lighter to heat seal the end.
You should be doing all of this on the WRONG side of the skirt.
Step 15: To finish the skirt, turn it right side out and fold the ribbon over the top edge to cover the unfinished edges, pinning as you go.
At this point I switched back to red thread so that my top stitching would be hidden.
Again sew along the bottom edge of the ribbon making sure that you are sewing below the elastic. You will be able to feel the elastic through from the other side.
Sew all the way around stretching completely as you go.
When you are done sewing it should look neat and finished.
I hand-stitched a bow on the waist just for fun but you could leave it plain or add whatever you like! Tah-dah! It's finished!
A fun little skirt that you can whip out reasonably fast!
You know I love quick projects!
The other great thing about this skirt is how cheap it was to make.
The roll of tulle was only $3.99 and everything else I had on hand, even the white satin was leftover from the blessing gown I made Little Miss last year.
What a cutie!
Now if I could just teach her to stand still then all my pictures wouldn't be so blurry!


No comments:
Post a Comment