Monday, January 14, 2013

Making progress...kind of.


Yay!  I finally got my husband to help out with the big project.

We worked on putting in the can lights for the family room.
This is me learning to wire some lights.
I thought it was really fun!
When I told my husband that, he looked at me like I was crazy!

I was all happy until I tried to put that light up into the ceiling and it wouldn't go in!
Ugh.  A giant sewer pipe right in the way.
DANG!  

So the light is still hanging there. 
Until we move the hole which requires much more work than it sounds.
Bummer.

Friday, January 4, 2013

2013 YW Theme

I guess I'm all about free printables this week.

Every year the youth in our church receive a theme to memorize and live by.
I love that they have something to focus on and strive for during the year.

Well, it's a new year so that means...
it's a new theme!

And I love what has been chosen for this year.

“Stand ye in holy places, and be not moved, 
until the day of the Lord come; 
for behold, it cometh quickly, saith the Lord” 
D&C 87:8
I teach the 12 & 13 year old girls and Sugardoodle is my go-to place 
for finding the most awesome handouts and help for my lessons.  And of course that's where I came across this fabulous printable.
I ran out of white cardstock so I just printed these out on plain white paper and mounted them on to coordinating cardstock. 
 I decided rather than just give this to the girls as a handout,
 they might like to keep them for the year.  
I printed them as a 5x7, then I laminated them and put magnet strips on the back.  
That way they can put them on a magnet board on their room or on the refrigerator or wherever they can see it often.

I think they are so fun!

Thanks to The Dearth Duo for the great printable!
There are even five different sizes to choose from.  Sweet!

Thursday, January 3, 2013

Warm & Cozy Toes

Just a little something...  I made for my visiting teaching sisters. 

One of my favorite food blogs is Our Best Bites
Sara & Kate are so talented when it comes to delicious recipes.
(So talented that they have published two fabulous cookbooks!)

When I saw this super cute free printable Sara posted
I knew exactly what to use it for!

I just added fuzzy socks, nail polish, some ribbon, and Presto!

Happy Winter!

 Thanks Sara for the great idea and printable! Love it!

Sunday, December 30, 2012

Tulle Skirt Tutorial

Before Christmas I got the cutest legwarmers from BabyLegs for Little Miss.
I especially loved the candy cane ones 
 but she didn't really have anything to wear them with. 

So, I decided to make her a little tulle skirt to match.
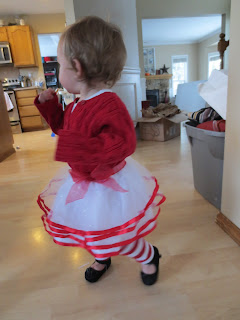
I made this for Christmas but I'm exited to put her in it for Valentine's Day too!  It's coming up!

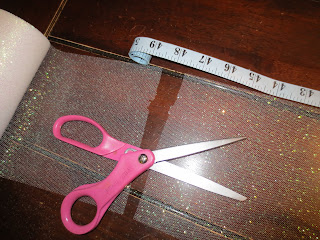
I picked up a roll of sparkly tulle in the wedding section at Michaels because that's where I happened to be when I thought about it and I didn't want to drive all the way down to Joanns.
The roll was only 6" wide which was perfect for baby girl.

Then I searched the web for a tutorial on how to make a quick and easy tutu skirt.
Although there were plenty of wonderful tutorials
 
I ran into a few problems:
1. The no-sew tutorials used a lot more tulle than I had bought  (and of course I was making this skirt at 10pm on Saturday night for her to wear to church in the morning, therefore, no time to get more tulle.)
2.  I wanted a solid layer under the tulle so that you didn't see her naked legs and onesie underneath. (no tutorials for that)
3. I wanted to be able to see the different layers of the skirt not just have a big poof ball of tulle.
(no tutorials for that)
 
SO...I decided to come up with my own tutorial.
AKA fly by the seat of my pants.
 
Things I used:
6" x 10 yd roll of tulle
white satin for underneath layer
roll of 1/4" red satin ribbon for trim
roll of 2" wide red ribbon for waist trim and bow
elastic
sewing machine
red thread
white thread
scissors
pins
 
Disclaimer:  If you choose to use glittery tulle like I did, there will be glitter EVERYWHERE.  My house, my child, and myself were all covered with glitter for days.  Even the bench that we sat in at church was more than quite sparkly when we left. You have been warned!
 
Step 1 : I had to decide how many layers of tulle I wanted and how long I wanted my skirt to be.
I knew I wanted four layers of tulle, each layered 1inch above the other. 
 Since my tulle was 6 inches wide, I knew having each of my other layers one inch above the last would make my finished skirt 9 inches.
 
Step 2: I had to decide how full I wanted to make the skirt.  Since my little girl's waist is 16 inches around, I multiplied that by three and cut all my layers of tulle 48 inches long.  
If you want your skirt more full just cut your layers longer.
  
 
Step 3: Using red thread I used a straight stitch to sew the ribbon along the bottom of each layer of tulle.
This is after I had sewn the ribbon on the bottom of each layer.  
By adding the ribbon, now you can really see each layer.  Exactly what I wanted!
 
Step 4 Next I cut my underneath layer of satin 9 1/2 inches by 48 inches long.  The extra half inch is for the hem.

 
Step 5 : Then I ironed up the hem 1/2 inch and sewed it using a straight stich with the white thread.  
NOTE: On my fabric it was already the selvedge edge which means it was a finished edge that would not unravel so I only had to fold it up once.  If your fabric is not on the selvedge edge then you will need to add an extra 1/2 inch to the width of your fabric when cutting it out and then fold it over and iron it down twice before sewing so that the unfinished edge is inside the fold.
 
Step 6:  Sew your first layer of tulle onto your satin lining using a straight stitch.  Make sure to line up the ribbon edge of the tulle with the hemmed edge of the satin lining.
 
Step 7: I forgot to take a picture of this step. Sorry! What you are going to do is take the two ends of each layer and match them up right sides to together and sew using a straight stitch, making sure to backstitch when you start and end.  Do this to each layer and you should now have three loops of tulle and one loop with tulle and satin.  I hope that makes sense :)
 
Step 8Next I sewed a gathering or basting stitch about 1/4 inch down from the unfinished edge on the stain layer and then another gathering stitch 1/4 inch below that all the way around.
 No backstitching.

Step 9: Gather the top of the skirt as evenly as possible until it is the size that you are going for.  In my case 16 inches around.
Tie your loose strings so that your skirt stays that size while you are adding the other layers.

Step 10: Gather your other layers of tulle.  An easy way to do this is to just hold the tulle tightly as it feeds through your sewing machine. 
  As you can see it will naturally gather in the back and you can loosen it or gather it tighter to the size you need after you have sewn all the way around.
 
Step 11: Slide your gathered layer of tulle down over the satin lining and pin it one inch above the last layer all the way around.  Sew using a straight stitch all the way around making sure to back stitch.  

Step 12: Repeat with the last two layers of tulle.  Your last layer should line up with the top of the satin lining.

Step 13: Turn your skirt wrong side out and attach your elastic to the waist of the skirt by matching it up to the top unfinished edge on the WRONG side of the skirt and sewing all the way around using a zigzag stitch.  Be sure to pull the elastic tight as you sew it around so that it will  bunch up and be stretchy when you are done sewing. 
 Ignore the red ribbon in this step, I got a little ahead of myself.
 
Step 14Again, forgot to take a picture, dang!!  
To cover the elastic and unfinished edge, lay the wide red ribbon on top of the elastic with the bottom of the ribbon just slightly below the bottom edge of the elastic. (NOT like the picture above)
Sew using a straight stitch along the edge of the ribbon directly below the elastic, stretching the elastic completely as you sew all way around. This will allow the ribbon to gather and stretch with the skirt.
I didn't measure my ribbon I just left it on the roll as I sewed all the way around and about an inch past my starting point making sure the ribbon continued to match up.  Then I cut off the excess ribbon and used a lighter to heat seal the end.
You should be doing all of this on the WRONG side of the skirt.
 
Step 15:  To finish the skirt, turn it right side out and fold the ribbon over the top edge to cover the unfinished edges, pinning as you go.  
At this point I switched back to red thread so that my top stitching would be hidden.
Again sew along the bottom edge of the ribbon making sure that you are sewing below the elastic.  You will be able to feel the elastic through from the other side. 
 Sew all the way around stretching completely as you go.
When you are done sewing it should look neat and finished.
I hand-stitched a bow on the waist just for fun but you could leave it plain or add whatever you like!       Tah-dah! It's finished!

A fun little skirt that you can whip out reasonably fast! 
You know I love quick projects!
 
The other great thing about this skirt is how cheap it was to make.
The roll of tulle was only $3.99 and everything else I had on hand, even the white satin was leftover from the blessing gown I made Little Miss last year.


What a cutie!
Now if I could just teach her to stand still then all my pictures wouldn't be so blurry!


Wednesday, December 19, 2012

Some before pictures

So right now I'm in the middle of a HUGE project.

Of course I forgot to take pictures at the very beginning, but this is where I am now.


I used to have bookshelves on either side of the fireplace.  I know, it sounds lovely right?
Not so lovely.  I promise.  They were big nasty oak beasts that took over the whole room 
and made it look dark and small.  


You can see a glimpse of them to the left of my bunch of halloween cuties.
The kids: Cute   The bookshelves: Gross

The trim is also 90's oak through most of the house. Ick.

And here is the kitchen:


Oak, oak, and more oak.  Disgusting.  Enough said.


The plan:
Rip out the oak bookshelves...done!
Paint the trim around the windows... just finished!
Build new bookshelves... in progress.
Add overhead lighting in the family room
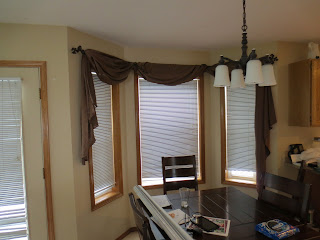
Put up curtains
Add crown to the cabinets
Paint kitchen cabinets
New cabinet hardware
New tile backsplash
New kitchen faucet
Paint the walls
Replace the flooring
Replace the oak wall trim
Add crown moulding
Replace oak door casings and doors
 
and probably a bunch more I'm forgetting.
 
So what I tell people is "Don't mind the messy house. We're under construction."
That's a good excuse, right? :)

Well, I'll keep you updated!


Sunday, December 16, 2012

Personalized Name Pillows


(Please excuse my lame camera phone pictures)

I love making these fun name pillows for gifts!  
It's never an expected gift but everyone loves them!  We had a birthday party, a new baby, and Christmas coming up so I thought I'd whip out a few of these babies. 

This was actually one of my first pins on pinterest.  I thought they looked so fun!  The link took me to Girlie Bird Boutique on Etsy.  Adorable stuff.  It's a bummer that now she's "on vacation".  

Anywho,  I decided to try making it on my own.

First, you cut out your letters and fusible interfacing.
I used my silhoutte (most awesome crafting machine ever),
 but you could totally cut them by hand, no biggie.

Next, decide where you want them on the front of your pillow and iron them on.

Then, sew all the way around each letter with your sewing machine.
GO SLOW!

After that, sew your baby rick rack around each letter.
GO EVEN SLOWER!

When you're done with the rick rack, you are going to sew on the fringe.  
This step seems really intimidating but it's not that bad, I promise.
Just lay the pillow front (letter) side up and sew the fringe around the edge with the pom-poms facing the letters and the fringe edge matched up with the edge of the pillow.  Sew all the way around.

When you're done with that, lay the pillow backing on top (right sides facing) and pin all the way around and sew.  Make sure to leave an opening to turn and stuff your pillow.

When you turn your pillow right side out, all the pom-poms should be around the edges.  Stuff it good and slip-stich the opening closed.
Voila!  Now you have a great name pillow!  I love projects that only take a couple hours and you're done.  Instant gratification, baby!

This one is for my brand new niece.  Her name is Brynlee and it thought the pillow would turn out to long and weird-looking with her whole name on it so I just did a "B".  Still cute!


I promise to post an actual tutorial with more details and pictures on this at some point.  I just didn't take all the pictures I needed this time...dang.


Tuesday, December 11, 2012

It's my party and I'll cry if I want to!


Isn't she sweet!

This is Thing 5
This picture is from her 1st birthday last week.  I can't believe how this year has flown by!
I promise she doesn't always look like this.  She really is a little cutie!
   She just knows what she wants and how to get it.  
And I don't blame her, when you are #5 you have to make yourself be heard! 
 

For the kids birthdays I try to make something fun.
Whether it's cupcakes, cakepops, or a fun cake, I try to make it special.
By far, my favorite blog when it comes to making cute treats is Bakerella.
That Girl is AMAZING!

I don't necessarily love to bake.  I enjoy baking but what I love to do is decorate!
Bakerella has so many incredible ideas! 
When I first found her blog I spent hours going through her posts.  
Everything she makes is beautiful.

For Little Miss I wanted to make something just as sweet as she is! 

So here we have:
Strawberry Milkshake Cupcakes


Soooo fun to make and easy too!

I found the idea here at Bakerella and followed her instructions.
 I even got to try my hand at making ganache for the chocolate syrup!
It sounds fancy but it's simple to make and is so yummy.
And for the perfect finishing touch I got to use pink paper straws and red gumballs 
for the cherries on top.
 

The kids loved them!
They even tried to suck their cupcakes through the straws. Silly kiddos :)


FYI: If you're wondering where I got my paper straws, I ordered them from Pick Your Plum.
It was one of their awesome daily deals.  I ordered red, pink, baby blue, and lime green.  I can't wait for more things to use them for.  I think they are so fun!